Brake bleeding is a practice used on hydraulic brake mechanisms to remove any air bubbles from the brake lines. Here we’ll see how bleeding brakes are done. The soft brake pedal can’t be fixed by buying new brake pads. You might have noticed that, even after replacing the brake pads, you still need to press the pedal all the way down to halt the vehicle. A set of brand-new, extra-thick pads should have been enough to get that pedal back to where it belonged, but it wasn’t.
When you get a spongy braking feeling, it would be difficult to tell whether they are engaging. The air in your vehicle’s braking system may manifest itself in several ways. It’s important to remove any air and change the brake fluid periodically. You can follow the steps below to properly bleed your brakes.
How to Brake Bleeding by Yourself
Step 1: Set Your Vehicle in The Safest Position (VERY IMPORTANT for Brake Bleeding)
Place wheel chocks under your vehicle’s wheels and park them on a level, dry surface. You need to release the hood and lock it. Put the car up on jack supports and take off the wheels so you can get under it.
Step 2: Flushing Out the Old Brake Fluid
The next step is to flush out most of the previous brake fluid from the master cylinder. At this point, you need to remove the master cylinder’s cap and drain the used brake fluid with a turkey baster or simply a vacuum pump. Don’t let the master cylinder get totally dry before bleeding it but leave some fluid in the cylinder instead.
Step 3: Replace the Brake Fluid
It’s time for some fresh master cylinder brake fluid. If you want air to go into the master cylinder, leave the top off or slightly ajar. Remember to replace the cap after each use of new brake fluid. Verify a perfect fit with the OE specification, whether it’s DOT 3, DOT4, DOT 5, or DOT 5.1. Grab your manual or contact the manufacturer for certain information.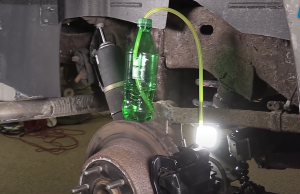
Step 4: Assign the Wheel to the Brake Bleeding
If you want to know the first target of bleeding and in what order, check the handbook. Typically, the wheel that is in the farthest proximity to the master cylinder is where you will begin. So, it depends on the particular vehicle you’re working on.
Step 5: Find the Brake Bleeding Valve
Figure out where the brake bleeder valve is. A little screw with a central hole. The brake bleeding valve for disc brakes is often located at the very top of the brake caliper’s top. If your brakes are drum-style, look for them in the upper part of the back of the braking assembly.
Step 6: Connect Valve and Pump
Seal the bleeder valve off by connecting the vacuum pump to it. Ensure that the connection is firm enough before opening the bleeder valve to prevent a messy process. This is the fundamental setup for the brake bleeding procedure, so you need to make it right.
Step 7: Open the Valve
Using a specialized wrench for the brake bleeder, open the bleeder valve, and using a vacuum pump, remove the old brake fluid. Get rid of the used brake fluid in the container. Keep an eye on the master cylinder and ensure the brakes aren’t bled dry. Keep refilling the master cylinder with new brake fluid. You will know whether the old brake fluid and air have been out of the master cylinder when the brake fluid stops bubbling, and the color clears up.


Step 8: Close the Valve
As you’ve drained most of the old brake fluid out of the master cylinder, you can now turn off the vacuum pump and seal the bleeder valve properly. At this point, the bleeding process has been done for one wheel but don’t add the brake fluid into the master cylinder yet.
Step 9: Apply the Procedure to the Remaining Wheels
You can now do the exact same with the remaining three wheels based on the order you’ve determined before. Don’t hesitate to make note of the successful procedure as your guide. Spending time in planning and testing would pay for a smooth bleeding procedure.
Step 10: Add the Brake Fluid to the Master Cylinder
Fill the master cylinder up to the maximum level of the line, then replace the cap. Check for contaminants and eliminate them effectively. It’s very important to fill the master cylinder with the same level for each wheel to ensure equal performance and to help you evaluate the bleeding you’ve just performed more accurately.
Step 11: Reinstall the Wheels
Now it’s time to install your wheels back in place and gently drop the vehicle to the ground. No need to rush, just take your time reattaching the wheels properly using the suggested torque.
Step 12: Test the Brake Performance and Feel
In the end, you can now perform a brake test. They need to have a solid, not squishy, feel. Make that the brakes are in good working order by taking the vehicle for a test drive. The braking should be responsive and halt the vehicle in a timely manner. If you notice any spongy feel and it won’t disappear after several tests, you may need to check for any leak and start over again.
ABS Bleeding with Scan Tool
A lot of ABS modulators don’t have bleeders. Then, scan valves and the pump with a diagnostic instrument. Using a diagnostic scan tool to bleed ABS brakes is generally recommended whenever possible. There are some specific colors of brake fluid that has to be changed over time.
The primary function of the scan tool is to start the pump and cycle the valves in order to vent the spaces. This device aids in turning on the pump and activating the dump valves to make bleeding in these areas possible.
Sometimes the ABS modules can be malfunctioned. ABS bleeding with a scan tool isn’t optional if your car has no bleeder. The scan tool itself must have a bi-directional feature that allows it to communicate with the module. It’s also very important to ensure the compatibility of the scanner with your vehicle.

As a mechanical engineer, it’s easy for David to explain the functionality of the tool. David test most of the tools before writing a review. its help him to learn something new and suggest the best product for you.
[…] Brake Bleeding by Yourself […]